

Unlock the Richness of Homemade Bone Broth in Under an Hour with Your Instant Pot!

There’s a special comfort that comes with a warm mug of bone broth, especially during chilly winter months. It’s a nourishing elixir that truly warms you from the inside out, offering a deep sense of well-being.
While traditional bone broth recipes often call for hours, sometimes even days, of simmering on the stovetop or in a slow cooker, modern life demands efficiency without compromising quality. Who has the patience to wait that long when you crave that comforting warmth right now?
This is where the magic of the Instant Pot (or any pressure cooker) comes into play. It transforms a time-consuming culinary process into an incredibly quick and straightforward one, delivering a rich, flavorful, and gelatinous bone broth in a fraction of the time.
Why Instant Pot Bone Broth? The Secret to Speed and Flavor
Pressure cooking is a game-changer for bone broth. As foodie scientist Harold McGee explains, “a pressure cooker is a special pot that seals tightly and traps hot steam to build the pressure and temperature.” This elevated pressure and temperature drastically reduce cooking times. Dishes that typically require several hours can be completed in as little as one-third of the time.
For bone broth, this means a significantly faster extraction of collagen, minerals, and rich flavors from the bones. Instead of waiting 12-24 hours for a stovetop broth or 8-10 hours for a slow cooker version, you can achieve a deeply nourishing and flavorful broth in under an hour of active pressure cooking time. This efficiency is unparalleled, making homemade bone broth accessible even on the busiest weekdays.
Beyond speed, pressure cooking also creates a more intensely flavored broth. The sealed environment prevents evaporation, concentrating the flavors and resulting in a richer, more robust liquid. It’s truly remarkable how this method can transform tough, collagen-rich cuts like oxtail and cross shanks into fork-tender ingredients while yielding an incredibly potent broth.

A Note on Pressure Cooker Safety: While modern pressure cookers are significantly safer than older models, it’s always crucial to read your specific appliance’s instruction manual carefully. Familiarize yourself with its safety features and operating procedures. Understanding proper filling levels, lid locking mechanisms, and pressure release methods is essential for safe and successful pressure cooking. Always prioritize safety in your kitchen.
The Incredible Health Benefits of Homemade Bone Broth
Bone broth is more than just a comforting drink; it’s a powerhouse of nutrients and compounds beneficial for overall health. Its traditional use spans centuries across various cultures, recognized for its restorative properties. Here’s a closer look at what makes bone broth so good for you:
- Rich in Collagen and Gelatin: When bones and connective tissues simmer, they release collagen, which breaks down into gelatin. Gelatin is fantastic for gut health, helping to repair the gut lining and reduce inflammation. It also supports healthy skin, hair, and nails, contributing to their elasticity and strength.
- Supports Joint Health: The glucosamine and chondroitin found in bone broth are well-known for their benefits to joint health. These compounds help maintain the integrity of cartilage, potentially easing joint pain and stiffness.
- Boosts the Immune System: The amino acids, particularly glycine, proline, and glutamine, play a crucial role in supporting the immune system. Glycine aids in detoxification, while glutamine is vital for immune cell function, helping your body fight off illness.
- Abundant in Minerals: Bone broth is a natural source of essential minerals like calcium, magnesium, phosphorus, silicon, and sulfur, all in easily absorbable forms. These minerals are vital for bone density, nerve function, and overall metabolic health.
- Promotes Digestive Health: The gelatin content not only helps heal the gut but also aids in digestion by attracting digestive fluids. This can improve nutrient absorption and alleviate symptoms of digestive issues.
- Anti-Inflammatory Properties: Glycine, an abundant amino acid in bone broth, possesses potent anti-inflammatory properties, which can help reduce inflammation throughout the body.
Making your own bone broth ensures you’re getting a pure, additive-free product, maximizing these incredible health benefits. And with the Instant Pot, these benefits are now accessible faster than ever before.
Choosing Your Ingredients for the Perfect Instant Pot Bone Broth
The quality of your bone broth starts with its ingredients. Opting for high-quality bones and fresh aromatics will yield the most flavorful and nutrient-dense broth. Here’s a detailed look at what you’ll need:
Core Ingredients:
- Bones (2.5 pounds of assorted): This is the star of your broth. A mix of bones provides the best flavor and gelatin content.
- For Gelatin-Rich Broth: Prioritize bones with lots of cartilage and connective tissue. Chicken feet are exceptionally good for this and will guarantee a jiggly broth when chilled. Joint bones (knuckles, neck bones) from beef, pork, or lamb are also excellent sources of collagen.
- For Flavorful Broth: Marrow bones (beef femurs), oxtails, and cross shanks offer incredible depth of flavor. You can also use leftover roast chicken carcasses or pork rib bones. Don’t be afraid to mix and match! Using bones from the freezer is perfectly fine.
- Optional – Roasting Bones: For an even deeper, richer flavor, consider roasting beef or pork bones in the oven at 400°F (200°C) for 30-45 minutes before adding them to the Instant Pot. This caramelizes the bones and enhances their umami profile.
- Aromatics:
- Leeks (2 medium, cleaned and halved crosswise) or Onion (1, peeled and quartered): These provide a sweet, savory base note. Leeks offer a milder onion flavor, while onions add a more robust one.
- Carrot (1 medium, peeled and cut into three pieces): Adds a touch of sweetness and depth to the broth.
- Optional additions: A stalk of celery, a few sprigs of parsley, or a bay leaf can further enhance the complexity of your broth.
- Water (8 cups): Crucial for covering the bones and extracting their goodness. Remember the critical rule for pressure cookers: never fill more than two-thirds of the pot’s capacity to allow for steam buildup.
Flavor Enhancers:
- Red Boat Fish Sauce (2 tablespoons): While optional, I highly recommend using a high-quality fish sauce like Red Boat instead of salt. It provides a profound umami flavor that elevates the broth without making it taste “fishy.” It’s a secret ingredient that truly transforms the broth, adding a layer of savory complexity that salt alone cannot achieve.
- Dried Shiitake Mushrooms (3, optional): These contribute a wonderful earthy, savory note, further enhancing the umami profile of your broth. They are particularly good if you’re aiming for a deeper, more complex flavor.
A Quick Note on Apple Cider Vinegar: You might notice that many traditional bone broth recipes recommend adding apple cider vinegar, claiming it helps extract minerals from the bones. However, based on further research and expert lectures, I no longer find this addition necessary. There’s little scientific evidence to support its efficacy in mineral extraction for broth, and personally, I don’t prefer the slight acidic flavor it can impart. Feel free to omit it for a purer bone broth flavor.
Crafting Your Instant Pot Bone Broth: A Simple Guide
Making rich and flavorful bone broth in your Instant Pot is surprisingly simple. Follow these steps for a perfect batch every time:
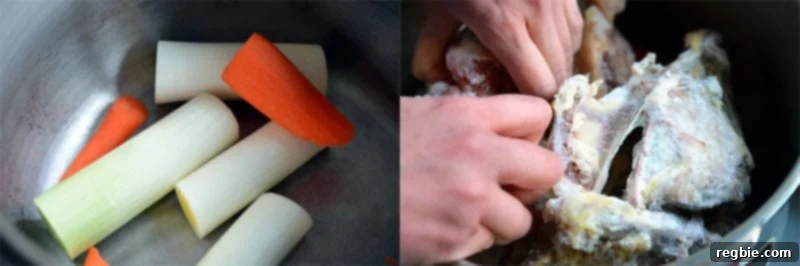
- Prepare Your Pot: Ensure your Instant Pot or pressure cooker is at least 6-quarts in capacity. Place the prepared leeks (or onion) and carrots directly into the pot.
- Add the Bones: Toss in your assorted bones. Don’t worry if they are frozen; the pressure cooker handles them beautifully.
- Fill with Water: Pour in enough water to generously cover all the bones. Critically, ensure you do not exceed two-thirds of your pressure cooker’s maximum fill line. Overfilling can be dangerous and prevent proper pressure buildup.

- Introduce Flavor Enhancers: Add the Red Boat fish sauce and, if you’re using them, the dried shiitake mushrooms. Stir gently to combine.
- Set to Pressure Cook:
- For Instant Pot: Securely cover and lock the lid. Ensure the vent is sealed. Program your Instant Pot to cook under high pressure for 30-50 minutes. If you’re using meaty shanks or oxtails, or simply desire a richer broth, I recommend setting the time closer to 50 minutes. For an even more profound depth of flavor and gelatin extraction, you can extend the cooking time to 2 hours on high pressure if you’re not in a rush – the broth only improves with more time.
- For Stovetop Pressure Cooker: Place the pot on a burner set to high heat. Once the pressure indicator pops up, signifying that high pressure has been reached, immediately reduce the heat to the lowest possible setting. The goal is to maintain high pressure without overcooking or burning the contents. A low flame is usually sufficient. Set your timer for 30-50 minutes, adjusting for bone type and desired richness.

- Natural Pressure Release: Once the cooking cycle is complete, whether on an Instant Pot or stovetop pressure cooker, allow the pressure to release naturally. This typically takes 10-15 minutes. Do not attempt to force the lid open before the pressure has fully dropped.
- Strain and Season:
- Carefully remove the lid once the pressure is fully released.
- If desired, gently skim any foam or “scum” from the surface of the broth. I personally don’t find this step strictly necessary as much of it disappears during straining, and I’m a bit lazy!
- Carefully strain the broth through a fine-mesh sieve or cheesecloth into a clean container. Discard the cooked bones and vegetables.
- Taste your freshly made broth and adjust seasoning if needed. If you plan to use the broth as a base for other dishes (like soups or stews), you might want to keep it on the blander side to allow for further seasoning in the final recipe.
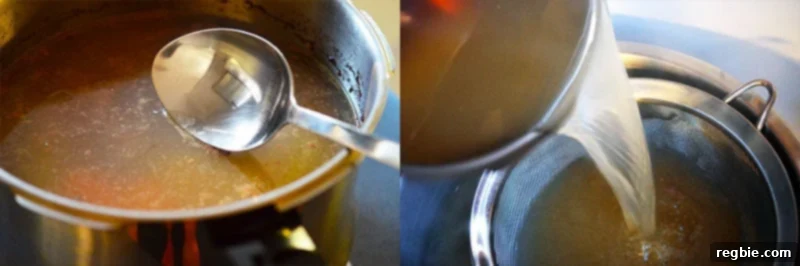
And there you have it – a wonderfully flavorful and nutrient-dense bone broth, made faster and more efficiently than with any other method. The difference in taste and quality is truly remarkable!

Expert Tips for a Rich, Gelatinous Broth
Achieving that coveted “jiggle” in your bone broth when it cools is a sign of high collagen content, indicating a truly nourishing elixir. Here are some pro tips to ensure your Instant Pot bone broth is always rich and gelatinous:
- Choose the Right Bones: As mentioned, chicken feet are your best friends for gelatin. Incorporating them into your bone mix virtually guarantees a well-gelled broth. Oxtails, beef knuckles, and meaty shanks are also excellent choices due to their high collagen content. Don’t be shy about asking your butcher for “soup bones” or “knuckle bones.”
- Don’t Overfill with Water: While it might be tempting to add more water to yield a larger batch, too much water will dilute the broth and prevent it from gelling properly. Stick to covering the bones, ensuring the water level is below the 2/3 mark of your pressure cooker.
- Longer Cook Times for Max Extraction: While 30-50 minutes produces a good broth, extending the high-pressure cook time to 90 minutes or even 2 hours will result in maximum extraction of collagen and nutrients, leading to an even more robust and gelatinous broth. If time permits, this extra cooking time is highly recommended.
- Natural Pressure Release is Key: Always allow for a natural pressure release. This slow, gradual release allows the temperature inside the pot to decrease slowly, giving the collagen more time to fully break down and integrate into the liquid, contributing to a better gel. A quick release can sometimes result in a less gelatinous broth.
- Chill for the Jiggle: The true test of a gelatinous broth comes after chilling. Once your broth has cooled in the refrigerator for several hours or overnight, it should have a wobbly, jelly-like consistency. If it doesn’t, don’t worry! It’s still incredibly nutritious, just perhaps not as collagen-dense. You can always use it in recipes or as a liquid base.
- Freeze in Portions: For easy use, freeze your cooled broth in individual portions. Ice cube trays are excellent for small quantities for cooking or drinking. For larger portions, use freezer-safe jars or silicone molds. This makes it convenient to grab just what you need without thawing a whole batch.
By following these tips, you’ll consistently create an Instant Pot bone broth that is both delicious and packed with the health-boosting gelatin you desire.
Storing Your Homemade Bone Broth & Culinary Uses Beyond the Mug
Once you’ve made a batch of this magnificent Instant Pot bone broth, knowing how to store it properly and exploring its many culinary uses will ensure none of your precious elixir goes to waste.
Storage Solutions:
Bone broth is perishable, so proper storage is essential to maintain its freshness and quality:
- Refrigeration: Once completely cooled, transfer your bone broth to airtight containers. It will keep well in the refrigerator for up to 5-7 days. You’ll notice it should gel into a solid, jiggly mass, which is a good sign of collagen!
- Freezing for Long-Term: For longer storage, freezing is your best option.
- Ice Cube Trays: Pour cooled broth into ice cube trays. Once frozen solid, transfer the cubes to a freezer-safe bag. These small portions are perfect for adding to sauces, stir-fries, or for quick individual servings.
- Muffin Tins or Silicone Molds: For larger, more convenient portions (e.g., 1/2 cup or 1 cup sizes), use muffin tins or dedicated silicone freezer molds. Freeze, then transfer to bags.
- Freezer-Safe Jars/Containers: For even larger quantities, use wide-mouth, freezer-safe glass jars or plastic containers, leaving about an inch of headspace to allow for expansion during freezing. Bone broth can be stored in the freezer for up to 6 months.
Culinary Inspiration:
While a steaming mug of bone broth is a perfect comfort on its own, its versatility in the kitchen is immense. It can elevate countless dishes:
- Soups and Stews: This is an obvious one! Use it as the base for any soup (chicken noodle, vegetable, lentil) or hearty stew. Its rich flavor will deepen the entire dish.
- Cooking Grains: Replace water with bone broth when cooking rice, quinoa, couscous, or pasta for an added layer of flavor and nutrients.
- Braising Meats and Vegetables: Use it as the liquid for braising short ribs, pot roasts, or tough cuts of meat. It also works wonderfully for cooking root vegetables until tender.
- Sauces and Gravies: Bone broth forms an excellent foundation for pan sauces, gravies, and reductions, adding body and savory depth.
- Stir-fries and Sautéing: A splash of bone broth can deglaze a pan, add moisture, and infuse flavor into stir-fries or sautéed vegetables and meats.
- Paleo/Whole30 Cooking: Being naturally compliant, it’s an indispensable ingredient for these dietary lifestyles, perfect for adding flavor without grains, dairy, or refined ingredients.
With a batch of Instant Pot bone broth on hand, you’ll always have a secret weapon for adding health, flavor, and comfort to your meals.
Looking for more recipe ideas? Head on over to my Recipe Index. You’ll also find exclusive recipes in my cookbooks, Nom Nom Paleo: Food for Humans (Andrews McMeel Publishing 2013), Ready or Not! (Andrews McMeel Publishing 2017), and Nom Nom Paleo: Let’s Go! (Andrews McMeel Publishing 2022).
Instant Pot Bone Broth – Fast, Flavorful, and Nom Nom Paleo Approved
Prep Time: 10 mins
Cook Time: 45 mins
Total Time: 55 mins
Servings: 8 cups
Author: Michelle Tam

Bone broth is good for you, but it takes forever to make—unless you’re using my recipe for Instant Pot bone broth. It’ll be ready in less than an hour!
Ingredients
- 2 medium leeks, cleaned and cut in half crosswise (or 1 onion, peeled and quartered)
- 1 medium carrot, peeled and cut into three pieces
- 2.5 pounds of assorted bones (I use a mixture of chicken and pork bones from the freezer or cross shanks and oxtails)
- 8 cups of water (enough to cover the bones but not more than 2/3rd the capacity of the pressure cooker)
- 2 tablespoons of Red Boat fish sauce
- 3 dried shiitake mushrooms (optional)
Instructions
- Toss the leeks and carrots in the pressure cooker or Instant Pot (make sure it’s at least 6-quarts), and toss in your bones (frozen is fine). Then, cover with water (make sure you don’t fill more than two-thirds capacity!).
- Add the fish sauce and dried shiitake mushrooms (optional).
- Then, cover and lock the lid, and program your Instant Pot to cook under high pressure for 30 to 50 minutes. (I let it go for 50 minutes if I’m cooking meaty shanks or oxtails). If I’m not in a rush, I set my Instant Pot on high pressure for 2 hours—the broth only gets better with more time.
- If you’re using a stovetop pressure cooker, place the pot on a burner set on high heat. Once the indicator pops up showing that the contents of the pot have reached high pressure, immediately decrease the temperature to the lowest possible setting to maintain high pressure (low is normally adequate). Set the timer for 30-50 minutes. When the timer goes off, turn off the burner and remove the pot from the heat.
- When the broth is done cooking in the Instant Pot or stovetop pressure cooker, let the pressure release naturally (10-15 minutes).
- Remove the lid, skim of the scum (if you desire), and strain the broth. Taste for seasoning and adjust if needed. You can keep it on the blander side if you will be cooking with it!
Video
Notes
Check out my updated post on how I store bone broth here.
Nutrition
Calories: 20kcal | Carbohydrates: 4g | Protein: 1g | Fat: 1g | Fiber: 1g
Nutrition information is automatically calculated, so should only be used as an approximation.
Like this? Leave a comment below!