
Embrace the Golden Elixir: Your Comprehensive Guide to Homemade Ghee
Few ingredients capture the essence of culinary tradition and modern health consciousness quite like ghee. This golden, aromatic clarified butter, deeply rooted in Indian cuisine and Ayurvedic practices, has gracefully transitioned into a staple for many health-conscious kitchens worldwide. As someone who appreciates both its incredible flavor and its myriad benefits, I’m thrilled to share a comprehensive guide to mastering homemade ghee.
Whether you’re embarking on a Whole30 challenge, following a Paleo lifestyle, or simply seeking a superior cooking fat, ghee stands out. Its unique preparation process removes milk solids, making it virtually lactose and casein-free, and imparts a distinct nutty flavor that elevates any dish. From high-heat stir-fries to delicate baked goods, ghee is an indispensable fat that promises to transform your cooking.
The Golden Secret: What Exactly is Ghee?
At its heart, ghee is a form of clarified butter, but with an important distinction. While clarified butter involves gently melting butter and skimming off the foam to separate milk solids from pure butterfat, ghee takes this process a step further. The butter is simmered for a longer period, allowing the milk solids to caramelize slightly and settle at the bottom of the pan. This gentle browning is key to ghee’s characteristic nutty aroma and rich, golden hue, distinguishing it from regular clarified butter.
This traditional Indian preparation, revered for millennia in Ayurvedic medicine for its medicinal and culinary properties, offers a superior cooking experience. It’s not just butterfat; it’s butterfat perfected, imbued with an intensified flavor and a stable composition.
Why Ghee Deserves a Spot in Your Pantry
Health and Dietary Benefits
For those navigating dietary restrictions or simply seeking healthier alternatives, ghee offers a wealth of benefits:
- Lactose and Casein-Free: The extended simmering process effectively separates and removes the milk solids, which contain lactose (milk sugar) and casein (milk protein). This makes ghee an excellent choice for individuals with lactose intolerance or dairy sensitivities, allowing them to enjoy the rich taste of butter without discomfort.
- High Smoke Point: Ghee boasts a remarkably high smoke point, typically around 485°F (252°C). This makes it ideal for high-heat cooking methods like sautéing, searing, and frying, as it resists oxidation and the formation of harmful free radicals more effectively than many other oils.
- Rich in Nutrients: Derived from butter, particularly grass-fed butter, ghee is a good source of fat-soluble vitamins A, E, and K2, as well as beneficial fatty acids. These nutrients play vital roles in vision, immune function, and bone health.
- Butyrate for Gut Health: Ghee contains butyrate, a short-chain fatty acid known for its anti-inflammatory properties and its role in supporting gut health. It can help nourish gut cells and promote a healthy digestive system.
- Delicious and Versatile: Beyond its health benefits, ghee offers an unparalleled flavor profile – a rich, nutty, and slightly sweet taste that enhances both savory and sweet dishes.
Culinary Versatility
Once you experience the culinary magic of ghee, you’ll find countless ways to incorporate it:
- High-Heat Cooking: Perfect for searing meats, stir-frying vegetables, or frying eggs, thanks to its high smoke point.
- Roasting: Drizzle over vegetables like sweet potatoes, carrots, or Brussels sprouts for an incredible caramelization and depth of flavor.
- Baking: Substitute for butter in many recipes to add a unique richness and slightly nutty note, especially in savory baked goods.
- Finishing Fat: Melt a spoonful over steamed vegetables, rice, or popcorn for a burst of flavor.
- Healthy Spread: Enjoy it spread on gluten-free toast or crackers.
- In Beverages: A popular addition to “Bulletproof Coffee” for a creamy texture and sustained energy.
Homemade vs. Store-Bought Ghee: Making the Right Choice
While making ghee from scratch is a rewarding and relatively simple process, store-bought options are readily available and can be a fantastic convenience, especially when time is short. Many reputable brands offer high-quality, grass-fed ghee that is Whole30-approved and meets strict dietary standards. When purchasing, look for labels indicating “organic,” “grass-fed,” and “100% pure ghee” to ensure you’re getting a product free from additives and made from quality butter.
However, the satisfaction and cost-effectiveness of making your own ghee are undeniable. Plus, the aroma that fills your kitchen during the process is an added bonus! It allows you to control the quality of the butter and customize the level of caramelization for your preferred flavor profile.
The Art of Homemade Ghee: A Step-by-Step Guide
Crafting your own batch of golden ghee is a surprisingly straightforward process. All you need is high-quality butter and a little patience. The result is a delicious, dairy-free cooking fat that will quickly become a favorite.
Yield and Preparation Time
This recipe yields approximately ¾ cup of golden ghee. The total preparation time, including simmering and straining, is around 20 minutes.
Essential Ingredients
- 1 cup unsalted butter: The quality of your butter directly impacts the flavor of your ghee. Always opt for unsalted, grass-fed butter whenever possible. Brands like Kerrygold are widely available and excellent choices, as they come from cows raised on natural pastures, resulting in butter rich in beneficial nutrients and flavor. Avoid using salted butter, as the salt will concentrate as the water evaporates, potentially leading to an overly salty ghee.
Equipment You’ll Need
- Medium saucepan with a heavy bottom
- Fine-mesh sieve or strainer
- Cheesecloth (triple-layered)
- Heat-safe bowl or measuring cup
- Airtight glass jar for storage
Detailed Method for Perfection
- Melt the Butter Gently: Begin by placing 1 cup of unsalted, grass-fed butter into a medium saucepan over low heat. It’s crucial to use low heat to prevent the butter from burning and to allow for a slow, controlled separation of milk solids. Allow the butter to melt completely.
- Observe the Separation: As the butter melts, you’ll notice it beginning to separate. The clear, yellow butterfat will rise to the top, while the white, milky solids (lactose and casein) will start to sink to the bottom and form a foamy layer on the surface. Continue to simmer the butter gently, maintaining a consistent low heat.
- The Bubbling Stage – Water Evaporation: Soon, the butter will begin to bubble. These bubbles are a clear indication that the water content in the butter is evaporating. As the water cooks off, the bubbles will gradually become smaller and less vigorous, and the surface will become more intensely foamy.
- Foaming and Browning of Milk Solids: Keep a close watch as the surface of the butter transforms into a thick, white foam. Beneath this foam, the milk solids at the bottom of the pan will begin to turn a light golden brown. Some of these solids may clump together and cling to the sides of the pan. This browning is essential for ghee’s signature nutty flavor, but it requires vigilance to prevent burning.
- The Crucial Golden Brown Stage: This is the most critical stage. Continue simmering, closely monitoring the color of the milk solids at the bottom. Once they turn a deep golden brown and begin to fall and settle firmly at the bottom of the pan – typically about 8 to 10 minutes after the melted butter starts bubbling vigorously – immediately remove the saucepan from the heat. The ghee itself should be a clear, deep golden color. If the solids turn dark brown or black, the ghee has burned and will have an undesirable bitter taste.
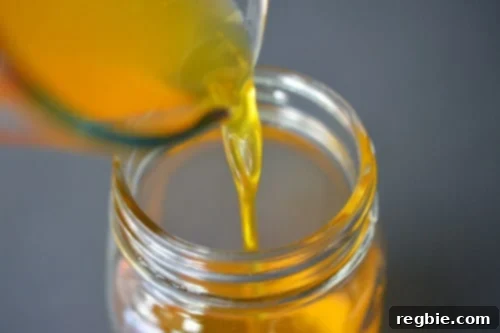
- Strain for Purity: Carefully place a triple layer of cheesecloth inside a fine-mesh sieve or strainer, and position it over a heat-safe bowl or measuring cup. Slowly and carefully pour the hot ghee through the cheesecloth-lined strainer. This process will capture all the browned milk solids, leaving you with pure, golden liquid ghee. Discard the filtered milk solids.
- Cool and Store: Allow the strained ghee to cool slightly before transferring it into a clean, airtight glass jar. Once cooled to room temperature, the ghee will solidify and become opaque with a silky-smooth, grainy texture.
Storage Tips for Longevity
Once the milk solids are removed, ghee is incredibly stable. It doesn’t require refrigeration and can be stored at room temperature in a cool, dark place for several months (up to 3-6 months, sometimes longer, depending on climate and sealed container). However, for maximum freshness and to be on the safe side, especially with homemade batches, I recommend storing your homemade ghee in the refrigerator. In the fridge, it can last up to a year or more. Always use a clean, dry spoon when scooping ghee to prevent contamination.
Creative Ways to Incorporate Ghee into Your Diet
Beyond its use as a cooking fat, ghee can elevate many aspects of your daily meals:
- Morning Boost: Stir a teaspoon into your morning coffee or tea for a creamy, nourishing boost.
- Breakfast Staples: Use it to scramble eggs, make omelets, or fry up some crispy bacon.
- Flavorful Roasts: Toss root vegetables like carrots, parsnips, and potatoes with ghee before roasting for a golden, caramelized finish.
- Savory Sautéing: Perfect for sautéing greens, mushrooms, or onions, adding a rich depth of flavor.
- Dessert Enhancement: While less common in Western baking, ghee can be used in certain desserts for a distinctive richness, especially in Indian sweets.
Whether you’re aiming for dietary compliance, exploring new flavors, or simply seeking a healthier cooking fat, homemade ghee is a truly rewarding endeavor. Its versatility and deliciousness will undoubtedly earn it a permanent spot in your culinary repertoire.
Looking for more recipe inspirations and guides? Explore my extensive Recipe Index for a wide array of delicious and healthy dishes. You can also find exclusive culinary creations on my iPhone and iPad app, and dive deeper into my cookbooks: Nom Nom Paleo: Food for Humans (Andrews McMeel Publishing 2013), Ready or Not! (Andrews McMeel Publishing 2017), and Nom Nom Paleo: Let’s Go! (Andrews McMeel Publishing 2021).
PRINTER-FRIENDLY RECIPE CARD
Ghee
20 mins
20 mins
12 tablespoons
Michelle Tam
This is how you can make ghee from scratch. The process is quick and painless, and you’ll end up with a yummy lactose- and casein-free cooking fat that’ll knock your socks off!
Ingredients
- 1 cup unsalted butter from grass-fed cows (Kerrygold recommended)
Instructions
-
Place the butter into a medium saucepan over low heat, and allow it to melt completely.
-
Once the butter is melted, the clear fat will begin to separate from the milky solids. Continue to simmer the butter gently on low heat.
-
As it starts bubbling, you’ll know that the water content is cooking off.
-
Observe the bubbles gradually getting smaller. The surface of the butter will start to resemble a thick foam. The milk solids at the bottom will begin to brown, and some solids may clump together and cling to the sides of the pan.
-
Keep a close eye on the pan. Once the milk solids turn a deep golden brown and begin to settle at the bottom (this usually takes about 8 to 10 minutes after the melted butter starts bubbling vigorously), remove the pan immediately from the heat.
-
Strain the hot ghee through a triple layer of cheesecloth into a heat-safe bowl or measuring cup.
-
Discard the filtered milk solids. These “nasty bits” are what we’re removing to achieve pure ghee.
-
Transfer the pure liquid ghee from the bowl or measuring cup into a clean, sealed glass jar for storage.
-
Once it cools, the ghee will solidify, becoming opaque, silky-smooth, and ready to cook with!
Notes
After the milk solids have been completely removed, ghee does not strictly require refrigeration. However, for extended freshness and to be on the safe side, especially with homemade ghee, I recommend storing it in the fridge.
Nutrition
Calories: 131kcal
|
Protein: 1g
|
Fat: 15g
Nutrition information is automatically calculated and should only be used as an approximation.
Like this? Leave a comment below!