
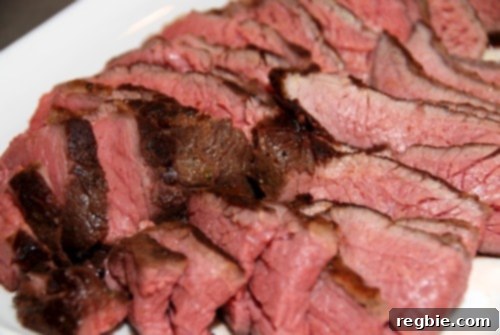
My culinary journey has often led me down paths of experimentation, particularly when it comes to sous vide cooking, especially with grass-fed beef. I’ve previously shared my initial struggles and learning experiences, acknowledging that mastering the art of perfectly cooked grass-fed cuts requires dedication and a willingness to refine techniques. This persistent pursuit recently led me to an exciting breakthrough: a perfectly executed sous vide grass-fed tri-tip roast, which graced our dinner table tonight alongside a butterflied leg of lamb.
Perfecting Sous Vide Grass-Fed Tri-Tip Roast: A Journey to Succulent Tenderness
For home cooks and food enthusiasts alike, the allure of sous vide is undeniable. It promises unparalleled precision, consistent results, and a level of tenderness often elusive with traditional cooking methods. However, working with grass-fed beef introduces its own set of nuances. Its leaner profile means it can be less forgiving if overcooked, potentially resulting in dry or tough meat. My past attempts with various grass-fed cuts sometimes yielded textures that were either too chewy or, paradoxically, too mushy after extended sous vide baths. But through continuous experimentation, I’ve discovered the sweet spot for a truly remarkable grass-fed tri-tip.
The Quest for the Ideal Grass-Fed Sous Vide Experience
Grass-fed beef, celebrated for its robust flavor and nutritional benefits, demands a thoughtful approach to cooking. Unlike its grain-fed counterparts, it contains less marbling, which can be a double-edged sword: healthier, yet prone to drying out if not handled correctly. Sous vide, with its ability to maintain a precise internal temperature throughout the entire cooking process, emerges as the ideal technique to unlock the full potential of grass-fed meats. It ensures that every fiber of the roast is cooked evenly to your desired doneness, minimizing the risk of overcooking the exterior while the interior remains underdone.
My objective has always been to achieve a medium-rare finish that is both tender and juicy, without compromising the integrity of the meat’s texture. The key, I found, lies not just in the temperature, but also in the cooking duration and the post-sous vide treatment. This particular tri-tip recipe is the culmination of those efforts, offering a method that delivers a wonderfully tender roast with a beautiful sear, perfect for any occasion.
What is Tri-Tip and Why Choose it for Sous Vide?
The tri-tip, also known as the bottom sirloin primal cut, Santa Maria steak, or triangle roast, is a fantastic cut of beef gaining popularity for its rich flavor and relatively tender texture. Shaped like a triangle, it features distinct grain directions that are crucial to understand for proper slicing. It’s a lean cut, making it an excellent candidate for sous vide, which excels at transforming leaner meats into incredibly tender dishes.
When cooked conventionally, tri-tip often benefits from high-heat searing followed by indirect cooking, or even slow roasting. However, sous vide cooking offers an advantage by ensuring even edge-to-edge doneness. This eliminates the common issue of a gradient of doneness, where the outer layers are more cooked than the center. For grass-fed tri-tip, this precision is particularly valuable, as it prevents the meat from becoming tough or dry, allowing its natural, earthy flavor to shine through.
Essential Ingredients for Your Sous Vide Grass-Fed Tri-Tip
This recipe is designed for 6-8 servings, making it perfect for a family meal or entertaining guests. The simplicity of the ingredients allows the natural flavor of the grass-fed beef to be the star, enhanced by a classic blend of seasonings.
Ingredients:
- 2½ pound grass fed tri-tip roast (Look for high-quality, ethically sourced grass-fed beef for the best results.)
- Diamond Crystal kosher salt (Its flakey texture allows for easy and even seasoning.)
- Freshly ground black pepper (Always fresh for maximum aroma and flavor.)
- Onion powder (Adds a subtle savory depth without the moisture of fresh onion.)
- Garlic powder (A classic pairing with beef, offering aromatic warmth.)
- 2 tablespoons lard or fat of choice (High smoke point fats like lard, avocado oil, or ghee are ideal for achieving a perfect sear.)
Equipment You’ll Need
Having the right tools can make all the difference in your sous vide adventure. For those new to sous vide, the investment is well worth it for the consistent, restaurant-quality results you can achieve at home.
- A reliable immersion circulator or sous vide water bath (like the SousVide Supreme).
- A vacuum sealer and vacuum-sealable bags (essential for effective sous vide cooking).
- A large cast iron skillet (or other heavy-bottomed pan for the final sear).
- Tongs (for handling the hot meat).
- A cutting board and sharp knife (for slicing against the grain).
- An ice bath setup (a large bowl filled with ice and water).
For a comprehensive list of all my recommended kitchen tools, you can find them here.
Mastering the Sous Vide Tri-Tip: A Detailed Method
This method breaks down the sous vide process into clear, actionable steps, ensuring a delicious outcome every time. Precision and patience are your best allies here.
Step 1: Prepare and Season Your Tri-Tip
Begin with a high-quality grass-fed tri-tip roast. I sourced mine from Sigona’s, known for their excellent meat selection. The initial preparation is crucial for developing flavor and ensuring a good sear later.
First, thoroughly pat the tri-tip dry with paper towels. Removing excess moisture from the surface is vital for effective seasoning adherence and will contribute to a better sear. Next, season the roast liberally on all sides with Diamond Crystal kosher salt, freshly ground black pepper, onion powder, and garlic powder. Don’t be shy with the seasoning; the sous vide process locks in these flavors beautifully. Once seasoned, place the tri-tip into a vacuum-sealable bag and seal it tightly, removing as much air as possible. This ensures even heat transfer during cooking.
Step 2: The Sous Vide Bath – Precision Cooking
With your tri-tip seasoned and sealed, it’s time for the sous vide bath. Fill your SousVide Supreme (or water bath with an immersion circulator) and preheat it to precisely 130°F (54.4°C). This temperature is ideal for a perfect medium-rare doneness, which I find works exceptionally well with grass-fed beef, yielding a tender yet firm texture. Once the water reaches the target temperature, carefully submerge the vacuum-sealed tri-tip into the bath. Allow it to cook for 6 hours. This extended cooking time at a lower temperature gently breaks down connective tissues, ensuring maximum tenderness without overcooking.
Step 3: Cooling and Chilling for Optimal Searing
After the 6-hour sous vide bath, immediately remove the tri-tip packet from the water. To stop the cooking process and prepare the meat for chilling, plunge the sealed bag into a large ice bath for at least 1 hour. This rapid cooling helps to firm up the meat’s texture and prevents it from cooking further. Once thoroughly chilled, the tri-tip can be stored in its vacuum-sealed bag in the refrigerator for several days until you’re ready to serve. This allows for convenient meal prep, as you can cook the roast ahead of time and finish it just before dinner.
Step 4: Reheating (If Chilled)
When you’re ready to enjoy your roast, it’s time for a quick reheating step if it has been refrigerated. Before going to bed this morning (or several hours before dinner), I refilled and preheated my SousVide Supreme back to 130°F (54.4°C). When I woke up (or about 30-45 minutes before searing), I took the chilled tri-tip roast out of the fridge and dropped the sealed bag back into the preheated sous vide bath. This ensures the internal temperature of the roast is brought back up to a uniform 130°F, guaranteeing that your final sear only creates a crust without further cooking the interior.
Step 5: The Crucial Sear – Developing Flavor and Crust
Once the tri-tip is reheated (or immediately after the initial sous vide if you didn’t chill it), remove it from the sous vide bath and carefully remove it from its bag. Pat the roast thoroughly dry with paper towels; this is a critical step for achieving a proper crust. Heat 2 tablespoons of lard (or your chosen high-smoke-point fat) in a large cast iron skillet over medium-high to high heat until it’s shimmering and just starting to smoke. The skillet must be super-hot to achieve a quick, intense sear without overcooking the interior of the meat.
Carefully place the dried tri-tip into the hot skillet. Sear the roast for approximately 2 minutes on each side, undisturbed. Resist the urge to move or flip the meat frequently; allowing it to cook undisturbed for the full 2 minutes per side ensures a deep, rich brown crust through the Maillard reaction. If desired, you can also sear the thinner edges for about 30 seconds each, though the main flat sides are most important.
Step 6: Rest and Serve
After searing, transfer the tri-tip to a cutting board. It’s essential to let the meat rest for 5-10 minutes before slicing. This allows the juices to redistribute throughout the roast, resulting in a more succulent and flavorful bite. When slicing, remember that tri-tip has two different grain directions. For maximum tenderness, identify both and slice thinly against the grain. Present your beautifully cooked sous vide grass-fed tri-tip roast, ready to be devoured.
My Journey to Sous Vide Success with Grass-Fed Beef
I was immensely more satisfied with this particular tri-tip roast compared to my previous sous vide experiments with other grass-fed beef cuts. The texture, while still possessing a slight, pleasant chew characteristic of grass-fed beef, was a vast improvement. I’ve learned to appreciate that grass-fed meat has a tendency to become unpleasantly mushy and powdery if cooked for too long in the sous vide bath, especially at higher temperatures. This experience has solidified my approach moving forward: I will unequivocally stick with 130°F as the optimal cooking temperature for grass-fed roasts and generally opt for a slightly shorter steeping time in the water bath to preserve that ideal texture.
Pro Tips for the Best Sous Vide Tri-Tip
- Quality Meat Matters: Always start with the best grass-fed tri-tip you can find. The quality of your ingredients directly impacts the final taste.
- Don’t Skip the Drying: Patting the meat bone-dry before searing is non-negotiable for a perfect crust. Moisture on the surface will steam the meat instead of searing it.
- Hot Skillet, Quick Sear: A screaming hot cast iron skillet is your best friend for searing. The goal is to develop a deep brown crust in a short amount of time, preventing the interior from overcooking.
- Slice Against the Grain: Tri-tip has two distinct grain patterns. Identify them and slice thinly against both for the most tender bites.
- Experiment with Seasonings: While a simple salt, pepper, onion, and garlic powder blend is excellent, feel free to experiment with other rubs or marinades (applied before vacuum sealing) to customize the flavor.
Serving Suggestions & Pairings
This Sous Vide Grass-Fed Tri-Tip Roast is incredibly versatile and pairs well with a variety of sides. For a wholesome and satisfying meal, consider serving it with roasted seasonal vegetables like asparagus, Brussels sprouts, or sweet potatoes. A fresh garden salad with a light vinaigrette can provide a refreshing contrast. For those following a Paleo or Whole30 diet, cauliflower rice or a vibrant slaw would be excellent choices. Don’t forget a delicious dipping sauce, such as a chimichurri or a creamy horseradish sauce, to elevate the experience further.
Looking for more delicious and healthy recipe ideas? Be sure to head on over to my comprehensive Recipe Index. You’ll also discover exclusive recipes available on my iPhone and iPad app, and dive into my acclaimed cookbooks: Nom Nom Paleo: Food for Humans (Andrews McMeel Publishing 2013), Ready or Not! (Andrews McMeel Publishing 2017), and Nom Nom Paleo: Let’s Go! (Andrews McMeel Publishing 2021). Happy cooking!
PRINTER-FRIENDLY RECIPE CARD
Sous Vide Grass Fed Tri-Tip Roast
10 mins
6 hrs 35 mins
8 hrs
14 hrs 45 mins
6
Michelle Tam
Ingredients
- 2½ pounds grass fed tri-tip roast
- Diamond Crystal kosher salt
- Freshly ground black pepper
- Onion powder
- Garlic powder
- 2 tablespoons lard or your fat of choice
Instructions
-
Dry your roast and season it liberally with salt, pepper, onion powder, and garlic powder. Vacuum seal it.
-
Dump it in the SousVide Supreme set at 130°F for 6 hours.
-
Remove the packet from the machine and dunk it in an ice bath for 1 hour then store it in the fridge until you’re ready to eat it.
-
When you’re ready to serve up the roast, put the hunk of meat back in the SousVide Supreme at 130°F for 30 minutes to reheat the meat.
-
Remove the tri-tip and dry it off. Heat up the lard in a large cast iron skillet over medium-high heat and sear the roast for 2 minutes on each side undisturbed.
-
Let the meat rest then slice it up. Enjoy!
Nutrition
Nutrition information is automatically calculated, so should only be used as an approximation.