
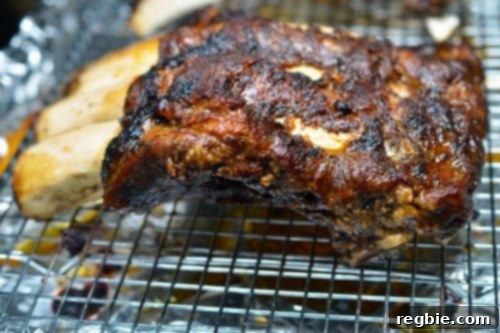
Perfect Pressure Cooker Grass-Fed Beef Back Ribs: Fall-Off-The-Bone Tender in Under an Hour
Imagine succulent, flavorful ribs that practically melt in your mouth, yet are ready in a fraction of the time typically required. For generations, beef back ribs, especially the robust grass-fed variety, have been a culinary delight best achieved through hours of patient, low-and-slow cooking. This extended process breaks down tough connective tissues, transforming them into a tender, juicy masterpiece. But what if we told you that you could achieve the same “fall-off-the-bone” perfection in less than an hour, thanks to the magic of your pressure cooker?
This recipe for Pressure Cooker Grass-Fed Beef Back Ribs is not just a time-saver; it’s a game-changer for anyone craving deeply flavorful, incredibly tender ribs without the all-day commitment. Say goodbye to lengthy braising and hello to a quick, easy, and undeniably delicious dinner solution. Don’t let old fears of exploding pots deter you; modern pressure cookers are incredibly safe and efficient. When used correctly, they deliver consistently amazing results, saving you precious time and energy while bringing a gourmet meal to your table.
Why Choose Grass-Fed Beef Back Ribs?
Grass-fed beef back ribs are a cut often overlooked but immensely rewarding. Unlike their pork counterparts or beef short ribs, back ribs consist of meat found between the bones, offering a rich, beefy flavor that’s distinct and deeply satisfying. The meat is leaner and adheres closely to the bone, making the cooking method crucial for tenderness.
Beyond their unique flavor, grass-fed beef boasts significant nutritional advantages. Cattle raised on grass tend to have a more favorable omega-3 to omega-6 fatty acid ratio, higher levels of conjugated linoleic acid (CLA), and increased amounts of vitamins A and E compared to grain-fed alternatives. Choosing grass-fed not only supports sustainable farming practices but also brings a healthier, more nutrient-dense meal to your plate. When cooked properly, these ribs offer a robust, earthy taste that perfectly complements any dry rub or sauce.
The Magic of Pressure Cooking for Tender Ribs
Pressure cooking is a revolutionary technique for preparing tough cuts of meat like beef back ribs. At its core, a pressure cooker creates a sealed environment that traps steam, increasing the internal pressure and, consequently, the boiling point of water. This superheated steam penetrates the meat more quickly and effectively than conventional cooking methods, rapidly breaking down collagen and connective tissues that make ribs tough.
The benefits are manifold: **Speed** is the most obvious, transforming several hours of cooking into under an hour. **Moisture retention** is another key advantage; because liquid cannot escape, the ribs cook in their own flavorful juices, resulting in an exceptionally moist and tender final product. Furthermore, the intense heat and pressure can actually enhance the flavors of your dry rub and braising liquid, infusing the meat deeply. Modern pressure cookers, whether stovetop or electric, are designed with multiple safety features, making them incredibly reliable and user-friendly. Just remember to always follow your appliance’s instructions, and you’ll unlock a world of quick and tender meals.
Crafting the Perfect Dry Rub for Your Ribs
A phenomenal dry rub is the cornerstone of great ribs. It’s not just about adding flavor; the rub creates a delicious crust, or “bark,” on the ribs during the broiling stages, which is essential for texture and taste. The beauty of a dry rub lies in its versatility, allowing you to tailor the flavor profile to your personal preferences – whether you prefer something sweet and smoky, bold and spicy, or herbaceous and savory.
For this recipe, we recommend a robust rub that complements the richness of grass-fed beef. While a ready-made option like Penzeys Chili 9000 (a personal favorite for its complex, balanced heat) is excellent for convenience, don’t hesitate to experiment. A fantastic homemade basic rub often includes a combination of kosher salt, black pepper, paprika (smoked paprika adds depth), garlic powder, onion powder, a touch of brown sugar for caramelization, and a pinch of cayenne pepper for a subtle kick. Liberally applying your chosen rub and allowing it to marinate for several hours or overnight is crucial for deep flavor penetration, ensuring every bite is bursting with taste.
The Recipe: Pressure Cooker Grass-Fed Beef Back Ribs
Get ready to impress yourself and your guests with these incredibly tender and flavorful ribs, all thanks to the efficiency of your pressure cooker.
Yields & Preparation Time:
- Servings: 4
- Prep Time: 2 hours 15 minutes (includes marinating time)
- Cook Time: 45 minutes (active cooking and pressure release)
- Total Time: Approximately 3 hours
Ingredients You’ll Need:
- 1 rack of grass-fed beef back ribs (approximately 3.5 pounds)
- Dry rub of choice (such as Penzeys Chili 9000, or your preferred homemade blend)
- Kosher salt (adjust to taste, especially if your rub is unsalted)
- ¾ cup water
- 4 ounces of unsweetened applesauce (adds a subtle sweetness and moisture)
- 2 tablespoons coconut aminos (for a savory, umami depth without soy)
- 1 teaspoon fish sauce (adds incredible savoriness, don’t worry, it won’t taste fishy!)
Step-by-Step Instructions for Irresistible Ribs:
This process combines marination, a quick sear, pressure cooking, and a final glaze under the broiler to achieve maximum flavor and tenderness.
- Prepare the Ribs: Begin by patting your rack of grass-fed beef back ribs thoroughly dry with paper towels. This step is essential as it helps the dry rub adhere better and promotes a superior crust. Once dry, generously sprinkle your chosen dry rub and a touch of kosher salt over both sides of the ribs, ensuring an even coating.
- Marinate for Flavor: For optimal flavor development, wrap the seasoned ribs tightly in foil. Place them in the refrigerator to marinate for at least two hours. For an even deeper infusion of flavor, allow them to marinate for up to 24 hours. This resting period allows the spices to penetrate the meat, tenderizing and flavoring it from within.
- Preheat the Broiler: When you’re ready to cook, preheat your oven broiler. Position the oven rack approximately 4-6 inches from the heating element. This setup is crucial for achieving a beautiful char and crisp exterior on your ribs.
- Section the Ribs: Retrieve the marinated ribs from the refrigerator. Depending on the size of your pressure cooker, you’ll need to cut the rack into manageable pieces. For a standard 6-quart pot, dividing the rack into three relatively even sections usually works best. This ensures they fit comfortably inside the pressure cooker without overcrowding, allowing for even cooking.
- Initial Broiling for Char: Arrange the cut rib sections on a wire rack set inside a foil-lined, rimmed baking sheet. Broil the ribs for 1-2 minutes per side. The goal here is to create an initial char and caramelization on the surface, which adds depth of flavor and texture. Keep the broiler on; you’ll be using it again for the final touches!
- Prepare the Pressure Cooker Liquid: Into your pressure cooker pot, add the water, unsweetened applesauce, coconut aminos, and fish sauce. Stir these ingredients together until well combined. The applesauce provides a subtle sweetness and helps keep the ribs moist, while the coconut aminos and fish sauce contribute essential umami, creating a rich, savory broth. Place a trivet or rack at the bottom of the pot to keep the ribs elevated from the liquid.
- Load the Ribs and Seal: Carefully pile the pre-broiled rib sections into the pressure cooker, arranging them on the trivet. Securely lock the lid in place, ensuring it is properly sealed according to your pressure cooker’s instructions.
- Pressure Cook to Perfection: Turn the heat to high. Once your pressure cooker reaches high pressure (indicated by the pressure valve, specific to your model), reduce the heat to the lowest setting possible that still maintains high pressure. Cook the ribs at high pressure for 20 minutes.
- Release Pressure: After 20 minutes, you have two options for releasing the pressure:
- Natural Release: Turn off the heat and let the pressure come down on its own. This method is gentler and can result in slightly more tender ribs as the meat continues to cook softly.
- Quick Release: Carefully use the quick-release valve. This method is faster but can sometimes cause the meat to toughen slightly if done too abruptly. Follow your pressure cooker’s safety guidelines for quick release.
Once the pressure has fully released and the lid can be safely opened, remove the ribs.
- Prepare for Finishing: Carefully transfer the tender ribs back onto the wire rack on the foil-lined baking sheet. Set aside.
- Reduce the Braising Liquid: Pour the cooking liquid from the pressure cooker into a saucepan. Bring it to a simmer over medium-high heat and reduce it until it thickens to about 2 cups. This usually takes approximately 5 minutes. Reducing the liquid concentrates its incredible flavors, creating a rich sauce. If desired, skim off any excess fat that rises to the top. Taste the reduced liquid and adjust the seasoning with salt if necessary.
- Final Broil and Baste: Brush the reduced braising liquid generously over the ribs. Return the baking sheet to the preheated broiler. Broil for about 1 minute, or until the sauce caramelizes and the ribs develop some delightfully crunchy, sticky bits. Keep a close eye on them to prevent burning.
- Serve and Enjoy: Remove the ribs from the broiler. Let them rest for a few minutes before serving. With minimal time investment, you’ve created finger-licking, fall-off-the-bone tender ribs that are bursting with flavor. Try it and taste the difference!
Tips for Success and Variations
Making delicious pressure cooker ribs is straightforward, but a few additional tips can elevate your experience and allow for creative variations.
Choosing Your Pressure Cooker
While the recipe specifies a 6-quart pot, any modern pressure cooker will work. Electric models (like Instant Pot) offer more automated settings, while stovetop models often reach higher pressures. Familiarize yourself with your specific model’s operation, especially regarding pressure maintenance and release, for the best and safest results.
Customizing Your Rub and Sauce
Don’t be afraid to get creative with your dry rub! For a smokier profile, add smoked paprika or a pinch of chipotle powder. For a sweeter touch, increase the brown sugar. If you prefer a wet sauce, you can finish the ribs with your favorite BBQ sauce during the last broiling step instead of the reduced braising liquid, or serve both on the side. A touch of apple cider vinegar or Worcestershire sauce can also enhance the liquid’s tanginess.
Serving Suggestions
These pressure cooker grass-fed beef back ribs are hearty and flavorful enough to be the star of any meal. They pair wonderfully with classic BBQ sides like creamy coleslaw, tangy potato salad, or warm cornbread. For a healthier option, consider serving them with roasted sweet potatoes, steamed green beans, or a fresh garden salad. A cold craft beer or a robust red wine complements the rich beefy flavors beautifully.
Storage and Leftovers
Leftover ribs can be stored in an airtight container in the refrigerator for up to 3-4 days. To reheat, gently warm them in the oven at a low temperature (around 275°F / 135°C), covered with foil, until heated through. You can also re-broil them for a few minutes if you want to crisp them up again, brushing with a little extra sauce if desired.
Frequently Asked Questions (FAQ)
Can I use different types of ribs for this recipe?
Yes, you can adapt this recipe for other beef ribs like short ribs or even pork ribs. However, cooking times will vary. Beef short ribs, being thicker and meatier, might require an additional 5-10 minutes under pressure. Pork ribs generally cook faster, often needing only 15-18 minutes. Always consult specific pressure cooker recipes for those cuts or adjust cooking time based on your experience.
What if my ribs aren’t tender enough?
If your ribs aren’t as tender as you’d like after the initial 20 minutes, don’t worry! This can happen due to variations in meat thickness or pressure cooker models. Simply lock the lid back on and cook them for another 5-10 minutes at high pressure. Ensure your pressure cooker is reaching and maintaining high pressure correctly, and that your seal is intact.
Is grass-fed beef essential for this recipe?
While grass-fed beef is recommended for its unique flavor profile and nutritional benefits, it is not strictly essential. You can certainly use conventional beef back ribs. The pressure cooking method will still yield tender and delicious results, regardless of the beef’s feeding regimen. Just be aware that the flavor might differ slightly.
Conclusion: Your New Go-To Rib Recipe
Gone are the days when serving perfectly tender, flavorful beef back ribs meant hours chained to the kitchen. With the help of your pressure cooker, this recipe for Grass-Fed Beef Back Ribs delivers an incredibly satisfying meal with remarkable efficiency. From the rich, savory dry rub to the tender, fall-off-the-bone meat and the caramelized glaze, every element comes together to create a dish that tastes like it took all day to make, but was ready in under an hour.
Whether you’re hosting a gathering or simply enjoying a weeknight dinner, these ribs are sure to become a favorite. Embrace the speed and convenience of pressure cooking without compromising on flavor or texture. We encourage you to give this recipe a try and experience the sheer delight of restaurant-quality ribs right in your own home!
Explore More Delicious Recipes
Looking for more culinary inspiration? Head on over to our Recipe Index for a wide array of delightful dishes. You’ll also find exclusive recipes on our iPhone and iPad app, and in our acclaimed cookbooks: Nom Nom Paleo: Food for Humans (Andrews McMeel Publishing 2013), Ready or Not! (Andrews McMeel Publishing 2017), and Nom Nom Paleo: Let’s Go! (Andrews McMeel Publishing 2021).
Printer-Friendly Recipe Card
Pressure Cooker Grass Fed Beef Back Ribs
Grass fed beef back ribs are normally cooked low and slow for many hours to break down the collagen in the tough meat. This pressure cooker recipe achieves the same tender results in less than an hour.
Prep Time: 2 hours 15 mins | Cook Time: 45 mins | Total Time: 3 hrs
Servings: 4
Author: Michelle Tam
Ingredients
- 3.5 pound grass fed beef back ribs (1 rack)
- Dry rub of choice (e.g., Penzeys Chili 9000)
- Kosher salt
- ¾ cup water
- 4 ounce unsweetened applesauce
- 2 tablespoon coconut aminos
- 1 teaspoon fish sauce
Instructions
- Pat a rack of grass-fed beef back ribs dry with a paper towel. Sprinkle liberally on both sides with your dry rub and kosher salt.
- Wrap the ribs in foil and marinate in the refrigerator for at least two hours, or up to a day, for best flavor.
- When ready to cook, preheat the broiler with the rack positioned 4-6 inches from the heating element.
- Remove the ribs from the fridge and cut the rack into pieces that will fit comfortably in your pressure cooker (e.g., three even pieces for a 6-quart pot).
- Place the chopped ribs on a wire rack atop a foil-lined, rimmed baking sheet.
- Broil the ribs for 1-2 minutes on each side to develop a nice char. Keep the broiler on for the final step.
- Add the water, applesauce, coconut aminos, and fish sauce to the pressure cooker. Stir to combine, then add a trivet or rack to the pot.
- Pile the ribs into the pressure cooker and securely lock on the lid.
- Crank the heat to high. Once the pot reaches high pressure, reduce the heat to the lowest setting possible to maintain high pressure.
- Cook on high pressure for 20 minutes. Let the pressure come down naturally, or release it quickly according to your cooker’s instructions.
- Carefully remove the ribs and place them back on the wire rack atop the foil-lined, rimmed baking sheet.
- Simmer the cooking liquid in a saucepan until it is reduced to about 2 cups (approximately 5 minutes). Skim off any excess fat if desired, and adjust seasoning to taste.
- Baste the ribs generously with the reduced braising liquid and broil them for about a minute to achieve some delicious crunchy bits and a beautiful glaze. Watch closely to prevent burning.
Nutrition Information
Calories: 860kcal | Carbohydrates: 5g | Protein: 50g | Fat: 100g | Fiber: 1g | Sugar: 2.5g
Nutrition information is automatically calculated, so should only be used as an approximation.