
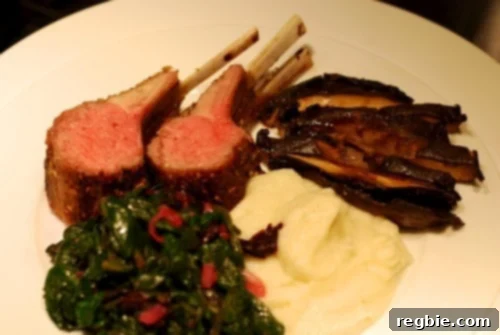
For many home cooks, the idea of preparing a rack of lamb often conjures images of complex culinary feats reserved for professional chefs or high-end restaurants. The mere mention can feel intimidating, shrouded in a mystique that suggests it’s too challenging, too time-consuming, or simply too fancy for a casual weeknight dinner. I used to be one of those people. The thought of perfecting such an elegant cut of meat at home always seemed like an ambitious endeavor, largely due to a preconceived notion of difficulty and, perhaps, a touch of culinary laziness.
However, a serendipitous encounter at my local market with those neatly frenched lamb racks, looking so inviting and promising, sparked a spontaneous decision. I decided to challenge my own reservations and bring one home. What I discovered was nothing short of a revelation: cooking rack of lamb is not only incredibly easy but also astonishingly quick. It shatters the myth of gourmet cooking being an all-day affair. With just a few simple steps and the invaluable aid of a reliable meat thermometer, you can achieve a perfectly roasted, tender, and succulent rack of lamb that will impress anyone at your table, including yourself. This guide will walk you through the surprisingly straightforward process, proving that this impressive dish is well within reach for any home cook.
Effortlessly Delicious: The Ultimate Guide to Quick & Simple Roasted Rack of Lamb
Unlock the secrets to preparing a restaurant-quality rack of lamb right in your own kitchen. This comprehensive guide simplifies the process, ensuring you can create a memorable meal in under an hour.
Why Rack of Lamb is a Game-Changer for Home Cooks
Rack of lamb, often perceived as a dish exclusively for special occasions, is surprisingly versatile and accessible. Its elegant appearance and rich flavor make it a showstopper, yet its preparation time rivals that of many weeknight staples. Frenched racks, where the bone ends are cleaned of meat and fat, not only offer a beautiful presentation but also make carving a breeze. This cut of lamb is lean, packed with protein, and absorbs flavors beautifully, making it an excellent canvas for various seasonings. Whether you’re looking to impress guests, celebrate a milestone, or simply treat yourself to something extraordinary without the fuss, a quick roasted rack of lamb delivers on all fronts. It’s a testament to the fact that gourmet doesn’t have to mean complicated.
The Essential Ingredients for Your Quick Roast
Serves 2
Achieving a flavorful rack of lamb starts with quality ingredients and a thoughtful selection of seasonings. Here’s what you’ll need:
- 1 Rack of Lamb (~1 pound): Look for a frenched rack for easier carving and a more elegant presentation. A good quality lamb will have a delicate, slightly sweet flavor.
- 1 Tablespoon of Dukka Seasoning: This aromatic Egyptian spice blend typically includes roasted nuts (like hazelnuts), sesame seeds, coriander, and cumin. Its earthy, nutty, and slightly spicy profile complements lamb beautifully, adding a unique depth of flavor. If Dukka is unavailable, you can create a similar flavor profile with a mix of dried rosemary, thyme, garlic powder, and a pinch of paprika.
- Kosher Salt: Generous seasoning is key for lamb. Kosher salt provides excellent flavor penetration without being overly salty, enhancing the natural taste of the meat.
- Freshly Ground Black Pepper: Adds a sharp, pungent counterpoint to the richness of the lamb. Always use freshly ground for the best aroma and flavor.
- 2 Tablespoons Coconut Oil or Ghee: These fats have high smoke points, making them ideal for searing. Coconut oil imparts a subtle sweetness, while ghee offers a rich, buttery flavor. Avocado oil is another excellent alternative due to its high smoke point and neutral flavor.
Indispensable Equipment for a Flawless Result
While fancy gadgets aren’t necessary, a few key tools will significantly enhance your lamb roasting experience and guarantee success.
- A Reliable Meat Thermometer: This is arguably the most crucial piece of equipment for perfectly cooked meat. An instant-read thermometer like the Thermapen ONE ensures you hit the exact internal temperature for your desired doneness, eliminating guesswork and preventing over or undercooking. It’s the ultimate insurance policy for juicy, tender lamb.
- Large Cast Iron Skillet: A heavy-bottomed cast iron skillet is perfect for achieving that beautiful, crispy crust through searing. Its excellent heat retention ensures even browning. An oven-safe stainless steel skillet can also work effectively.
- Foil-Lined Baking Sheet: A baking sheet lined with aluminum foil makes cleanup incredibly easy and prevents drippings from sticking.
- Sharp Carving Knife: Essential for neatly slicing the lamb into individual chops after resting.
- Cutting Board: A sturdy cutting board is needed for seasoning and carving.
For a comprehensive list of recommended kitchen tools, you can find more suggestions here.
The Method: Masterful Roasting in Simple Steps
This method, inspired by the precision of culinary experts like those at Cook’s Illustrated, simplifies the process of achieving a perfectly roasted rack of lamb. Their rigorous testing ensures foolproof results, and it’s a technique that has consistently delivered for me.
Step 1: Prepare Your Oven and Baking Sheet
Begin by preheating your oven to 425°F (218°C). While the oven heats, place a foil-lined baking sheet on a rack in the lower-middle position of your oven. Allowing the baking sheet to preheat in the oven ensures that when the lamb transfers from the searing pan, it immediately begins cooking evenly on all sides, contributing to a beautiful crust and consistent doneness.
Step 2: Expertly Season the Lamb
Generously season the entire rack of lamb with kosher salt and freshly ground black pepper. Don’t be shy; a good amount of seasoning is vital for flavor penetration. After the initial salt and pepper, sprinkle the Dukka seasoning evenly over the lamb, gently pressing it into the meat to create a flavorful crust. While my chef sister always advises salting meats up to 24 hours in advance for optimal flavor and moisture retention, I’ve found that even salting just 10 minutes prior to searing yields delicious results. The key is thorough coverage.
Step 3: Achieve a Perfect Sear
Heat 2 tablespoons of coconut oil or ghee in your large cast iron skillet over high heat. Wait until the fat begins to faintly smoke – this indicates it’s hot enough for a proper sear. Carefully place the rack of lamb, meat side down, into the hot skillet. Let it sizzle undisturbed for 4 minutes. This crucial step develops a deep, golden-brown crust through the Maillard reaction, locking in juices and adding immense flavor. After 4 minutes, flip the rack over and cook for an additional 2 minutes on the other side to brown the fat cap and seal the juices.
Step 4: Roast to Desired Doneness
Carefully transfer the seared rack of lamb from the skillet to the preheated, foil-lined baking sheet in the oven. Roast the lamb for approximately 12-15 minutes. The exact time will depend on the thickness of your lamb and your desired level of doneness. This is where your meat thermometer becomes indispensable. For a perfect medium-rare, aim for an internal temperature of 125°F (52°C). For medium, target 130°F (54°C). Remember to insert the thermometer into the thickest part of the meat, avoiding the bone. My lamb often ends up a little closer to 133°F (56°C) because I sometimes get distracted, but it still tastes wonderful.
Step 5: The Essential Resting Period
Once the lamb reaches your desired internal temperature, remove it from the oven immediately. Loosely tent the rack with aluminum foil and let it rest for 10 minutes. This resting period is critical. It allows the muscle fibers to relax and the juices to redistribute throughout the meat, resulting in a significantly more tender and succulent final product. Skipping this step often leads to dry, tough lamb, as all the delicious juices will simply run out when you slice it.
Step 6: Carve and Serve Your Culinary Masterpiece
After resting, remove the foil. Using a sharp carving knife, slice the rack into individual chops, typically two ribs per slice. Position your knife between the bones to ensure clean cuts. Arrange the chops artfully on a platter or individual plates. Who would have thought that a dish as exquisite as roasted rack of lamb could go from fridge to table in a mere 30 minutes of active cooking time, plus resting? It’s a testament to simple techniques yielding extraordinary results.
Tips for Success and Flavorful Variations
- Don’t Overcook: Lamb is best served medium-rare to medium. Overcooking can make it tough and gamey. Trust your meat thermometer!
- Seasoning Experiments: While Dukka is fantastic, feel free to experiment. A classic French approach might involve a crust of Dijon mustard, breadcrumbs, garlic, and fresh herbs like rosemary and thyme. A Mediterranean twist could include oregano, lemon zest, and sumac.
- Pairing Perfection: Roasted rack of lamb pairs beautifully with a variety of side dishes. Consider creamy mashed cauliflower for a paleo option, roasted asparagus, sautéed green beans, or a simple fresh salad with a tangy vinaigrette.
- Wine Pairing: A robust red wine like Cabernet Sauvignon, Merlot, or a Syrah/Shiraz complements the rich flavor of lamb wonderfully.
Health and Dietary Considerations
Lamb is an excellent source of high-quality protein, iron, and B vitamins. Being naturally low-carb and often compatible with paleo and Whole30 diets (depending on the seasonings used), it makes for a nutritious and satisfying meal. The preparation method described here keeps it clean and healthful, focusing on whole ingredients and healthy fats.
Cooking rack of lamb at home might seem daunting at first, but with this quick and simple method, you’ll discover that it’s an incredibly rewarding experience. The minimal effort belies the impressive outcome, allowing you to enjoy a gourmet meal without the stress. So, next time you see those beautiful racks of lamb, embrace the opportunity to create something truly special and delicious.
Looking for more recipe ideas? Head on over to my Recipe Index. You’ll also find exclusive recipes on my iPhone and iPad app, and in my cookbooks, Nom Nom Paleo: Food for Humans (Andrews McMeel Publishing 2013), Ready or Not! (Andrews McMeel Publishing 2017), and Nom Nom Paleo: Let’s Go! (Andrews McMeel Publishing 2021).
PRINTER-FRIENDLY RECIPE CARD
Quick and Simple Roasted Rack of Lamb
15 mins
20 mins
35 mins
2
Michelle Tam
Print Recipe
Ingredients
- 1 rack of lamb (about 1 pound)
- 1 tablespoon Dukka seasoning
- Diamond Crystal kosher salt
- Freshly ground black pepper
- 2 tablespoons coconut oil or ghee
Instructions
- Preheat the oven to 425°F (218°C) and place a foil-lined baking sheet on a rack in the lower middle of the oven.
- After seasoning the lamb very generously with salt and pepper, sprinkle on the Dukka seasoning.
- Heat 2 tablespoons of coconut oil or ghee over high heat in your large cast iron skillet. When it begins smoking, add the rack of lamb meat side down. Let the meat sizzle for 4 minutes until a nice crust forms. Then, flip the rack over and cook it for 2 more minutes on the other side.
- Next, place the rack on the warmed foil-lined baking sheet and stick it in the oven. Roast the lamb for roughly 12-15 minutes. For medium-rare, wait until the temperature of the meat reaches 125°F (52°C); for medium, wait for it to hit 130°F (54°C).
- When you take your lamb out of the oven, loosely tent it with foil and let it rest for 10 minutes. Then, slice up the rack into 4 pieces (2 ribs per slice) and serve it up!
Nutrition
|
Carbohydrates: 5g
|
Protein: 25g
|
Fat: 71g
|
Fiber: 3g
|
Sugar: 1g
Nutrition information is automatically calculated, so should only be used as an approximation.