
Effortless Excellence: Mastering Sous Vide Carnitas at Home
Carnitas, the beloved Mexican slow-cooked pork, is a culinary masterpiece renowned for its succulent tenderness and irresistibly crispy edges. Traditionally, achieving this perfect balance involves hours of simmering pork in lard, a process that, while incredibly rewarding, can be quite a commitment for the home cook. The thought of tending to a bubbling pot of fat often leads many, myself included, to opt for the convenience of a local taqueria.
However, what if there was a way to capture that authentic, melt-in-your-mouth flavor with significantly less hassle? Enter the revolutionary sous vide method. Inspired by a super-simple yet scrumptious recipe from a fellow food enthusiast, “R,” I discovered an incredibly straightforward approach to crafting perfect carnitas right in my own kitchen. The moment I learned about this technique, I was compelled to retrieve a substantial pork butt from my freezer, eager to recreate the magic. This method streamlines the process, transforming a potentially laborious task into an accessible and enjoyable cooking adventure, resulting in carnitas so good, you’ll want to make them again and again.
Why Sous Vide is Your Secret Weapon for Perfect Carnitas
Sous vide, meaning “under vacuum” in French, is a cooking technique where food is vacuum-sealed in a bag and then cooked to a precise temperature in a water bath. This method offers unparalleled control, ensuring consistent results that are nearly impossible to achieve with traditional cooking methods. For a cut like pork butt, which is rich in connective tissue and fat, sous vide is a game-changer.
- **Unmatched Tenderness:** The long, slow cook in a precisely controlled water bath breaks down tough collagen into gelatin, resulting in incredibly tender, fall-apart pork that retains all its natural moisture. You won’t find a dry shred of pork here.
- **Consistent Results Every Time:** Gone are the days of guessing internal temperatures or worrying about overcooking. Sous vide ensures your pork reaches the ideal doneness uniformly from edge to center, every single time.
- **Flavor Infusion:** Sealing the pork with seasonings allows the flavors to deeply penetrate the meat without dilution, intensifying the overall taste profile.
- **Hands-Off Cooking:** Once the pork is in the water bath, you can essentially set it and forget it for hours, freeing up your time for other activities or simply relaxing. This makes meal prep incredibly convenient.
- **Perfect Browning Potential:** While sous vide makes the pork incredibly tender, it doesn’t create the crispy exterior. However, it sets the stage perfectly for a quick pan-fry or broiler finish, where those coveted caramelized, crunchy bits are effortlessly developed.
Essential Ingredients for Authentic Sous Vide Carnitas
Crafting delicious carnitas begins with selecting the right ingredients. Each component plays a vital role in developing the rich, complex flavors and textures characteristic of this Mexican classic.
- 4 pounds Pork Butt (Pork Shoulder): This cut is the cornerstone of great carnitas. Pork butt is a relatively inexpensive and forgiving cut, boasting a good balance of lean meat, fat, and connective tissue. The fat renders down during the long cooking process, basting the meat from within and contributing significantly to the signature rich flavor and moist texture. Look for a bone-in or boneless cut, just ensure it’s fresh and high-quality.
- 1 gallon Water for the Brine: Brining is a crucial step that enhances both the flavor and moisture retention of the pork. It’s not just about adding salt; it tenderizes the meat at a cellular level, making it more succulent.
- 1 cup Diamond Crystal Kosher Salt for the Brine: The type of salt matters! Diamond Crystal kosher salt is preferred by many chefs for its flakier texture and less aggressive salinity compared to table salt or other kosher salts, making it easier to control the saltiness of your brine. Ensure accurate measurement for optimal results.
- 4 tablespoons Penzey’s Arizona Dreaming Seasoning or Your Favorite Dry Rub: This is where the flavor truly blossoms beyond salt. Penzey’s Arizona Dreaming offers a convenient shortcut with a well-balanced blend of spices. However, feel free to customize with your own homemade dry rub. A classic carnitas rub often includes ingredients like cumin, dried oregano (preferably Mexican oregano), garlic powder, onion powder, chili powder, and a touch of orange zest for brightness. Don’t be shy with the seasoning; it forms a delicious crust when seared.
- 2 tablespoons Lard or Fat of Choice: For the final, glorious crisping stage, lard is king. Its high smoke point and distinct flavor lend an unparalleled authenticity to the carnitas. If lard isn’t available or preferred, high-heat oils like avocado oil or grapeseed oil can be used, but lard truly elevates the experience.
Essential Equipment for Your Sous Vide Carnitas Journey
Having the right tools makes all the difference in ensuring a smooth and successful cooking experience. While most items are standard kitchen fare, a few specialized pieces are essential for sous vide success:
- Sous Vide Immersion Circulator or Water Oven: This is the star of the show, maintaining precise water temperatures for extended periods. A reliable immersion circulator will attach to any large pot, while a water oven is a self-contained unit.
- Large Stock Pot or Container: To hold the water bath for your sous vide setup. Ensure it’s large enough to comfortably submerge your vacuum-sealed pork bags.
- Vacuum Sealer and Bags: Essential for sealing the pork tightly, preventing water from entering and ensuring efficient heat transfer. High-quality, food-safe bags are important.
- Cutting Board and Sharp Knife: For safely cubing the pork butt.
- Large Bowl or Container: For brining the pork cubes.
- Colander: For rinsing the pork after brining.
- Paper Towels: Crucial for thoroughly drying the pork before seasoning and searing.
- Cast Iron Skillet: The ultimate pan for achieving that deep, golden-brown, crispy crust on your carnitas after the sous vide bath. Its excellent heat retention is key.
- Wire Rack: For draining excess fat from the finished carnitas, ensuring they stay crisp.
- Tongs: For handling the pork during searing.
- All of my recommended kitchen tools are listed here.
Step-by-Step Method: Crafting Your Sous Vide Carnitas
This method breaks down the preparation into clear, manageable steps, ensuring you achieve incredibly tender and flavorful carnitas with ease. While the total time includes a substantial brining and cooking period, the active hands-on time is surprisingly minimal.
Preparation Phase: Setting the Stage for Flavor
- Cube the Pork Butt: Begin by trimming any excessively thick pieces of fat from your pork butt, though leaving some on is beneficial for flavor and moisture. Cut the pork into approximately 1 to 1.5-inch cubes. Uniformly sized cubes will ensure even cooking.
- Brine the Pork: In a large bowl or container, combine 1 gallon of water with 1 cup of Diamond Crystal kosher salt. Stir until the salt is fully dissolved. Submerge the cubed pork in the brine, ensuring all pieces are covered. Cover the container and refrigerate for a full 24 hours. This brining step is crucial for tenderizing the meat and seasoning it from within.
- Rinse and Dry: After 24 hours, remove the pork from the brine and place it in a colander. Rinse the pork cubes thoroughly under cold running water to remove any excess surface salt. This prevents the carnitas from becoming overly salty. Pat the pork cubes completely dry with paper towels. Achieving a dry surface is paramount for allowing the seasoning to adhere and for a superior sear later on.
- Season the Pork: In a clean bowl, toss the dried pork cubes with 4 tablespoons of Penzey’s Arizona Dreaming seasoning or your chosen dry rub. Ensure every piece of pork is evenly coated with the spices.
- Vacuum Seal: Divide the seasoned pork into two vacuum-sealable bags. Arrange the pork in a single layer as much as possible within each bag to facilitate even cooking. Vacuum seal the bags, removing all air. If you don’t have a vacuum sealer, you can use the water displacement method with Ziploc bags, submerging them slowly to force air out before sealing.
Sous Vide Cooking Phase: The Path to Perfect Tenderness
- Set Up the Water Bath: Fill your large stock pot or container with water and set your sous vide immersion circulator to 165°F (74°C). Allow the water to come to temperature and stabilize.
- Cook the Pork: Carefully submerge the vacuum-sealed pork packets into the preheated water bath. Ensure the bags are fully immersed. Cook for 28 hours. This extended low-temperature cooking period is key to breaking down the tough connective tissues in the pork butt, rendering it incredibly tender and juicy.
Finishing Phase: The Crispy, Golden Touch
- Remove from Water Bath and Blot Dry: Once the 28 hours are complete, carefully remove the cooked pork packets from the water oven. Open the bags and transfer the pork cubes to a plate lined with paper towels. Gently blot the pork cubes dry again. This step is vital for achieving a crispy exterior during the pan-frying stage, as moisture inhibits browning.
- Pan-Fry for Crispiness: Heat 2 tablespoons of lard (or your fat of choice) in a large cast-iron skillet over medium-high heat until shimmering. Add the pork cubes to the hot skillet in a single layer, working in batches if necessary to avoid crowding the pan. Cook for 3-5 minutes per side, or until the carnitas are beautifully golden brown and crispy on all sides. The goal is to develop that characteristic caramelized crust without drying out the interior.
- Drain Excess Fat: Once crispy, transfer the cooked carnitas to a wire rack set over a baking sheet. This allows any excess fat to drip away, keeping the carnitas delightfully crisp.
Serving Suggestions: Building Your Perfect Carnitas Meal
Now that your incredible sous vide carnitas are ready, it’s time to assemble your meal! The versatility of carnitas allows for numerous delicious presentations.
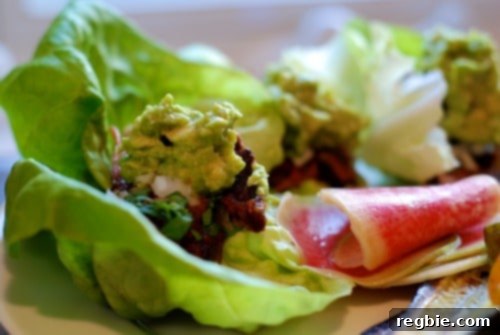
For a lighter, refreshing option, I highly recommend serving your carnitas in crisp lettuce tacos. Simply fill large lettuce cups with the succulent pork, then top with classic Mexican accompaniments. Diced white onions add a pungent bite, fresh cilantro provides a burst of herbaceous flavor, and a vibrant Primavera salsa brings a tangy counterpoint. Don’t forget a generous dollop of homemade guacamole for creamy richness and a touch of healthy fat. This combination creates a balanced and incredibly satisfying meal.
Beyond lettuce wraps, consider these delightful alternatives:
- **Traditional Tacos:** Serve with warm corn or flour tortillas, a squeeze of lime, and your favorite salsa.
- **Carnitas Bowls:** Create a flavorful bowl with rice, beans, corn salsa, avocado, and a drizzle of crema.
- **Burritos or Quesadillas:** Incorporate your carnitas into hearty burritos or cheesy quesadillas for a comforting meal.
- **Salad Topping:** Add carnitas to a fresh green salad for a protein-packed and flavorful lunch.
- **Nachos:** Layer crispy tortilla chips with carnitas, cheese, jalapeños, and all your favorite nacho toppings.
The beauty of homemade carnitas is the ability to customize your meal exactly to your liking. Experiment with different salsas, pickled red onions, cotija cheese, or even a sprinkle of toasted sesame seeds for an unexpected twist.
Make Ahead & Storage Tips
One of the fantastic benefits of the sous vide method for carnitas is its suitability for meal prepping. The long cook time means you can easily make a large batch to enjoy throughout the week or even freeze for future cravings.
- Storing Cooked Carnitas: Once the carnitas are pan-fried and cooled, transfer them to an airtight container and refrigerate for up to 3-4 days.
- Reheating: To reheat, spread the carnitas on a baking sheet and warm in a preheated oven at 350°F (175°C) for about 10-15 minutes, or pan-fry them gently in a little lard or oil until heated through and re-crisped.
- Freezing: For longer storage, freeze the pan-fried carnitas in a single layer on a baking sheet until solid, then transfer them to a freezer-safe bag or container. They can be stored for up to 3 months. Thaw in the refrigerator overnight before reheating.
The meal prep involved might require some advance planning, primarily due to the brining and sous vide cooking times, but the hands-off nature of these steps makes it surprisingly easy. The reward for your minimal effort is a consistently delicious, tender, and crispy carnitas that tastes like it came straight from a gourmet taqueria. This recipe is a keeper, and I fully intend to make it a staple in my kitchen!
A huge thank you to “R” for sharing such an inspiring and effective recipe. Your culinary wisdom has truly elevated my home cooking experience. I’ll be sure to repay you with a generous slab of pork belly!
PRINTER-FRIENDLY RECIPE CARD
Sous Vide Carnitas
Here’s an easy way to make take-out tasting carnitas at home.
15 mins
1 d 4 hrs 15 mins
1 d 4 hrs 30 mins
6
Michelle Tam
Ingredients
- 4 pounds pork butt
- 1 gallon water for the brine
- 1 cup Diamond Crystal kosher salt for the brine
- 4 tablespoons Penzey’s Arizona Dreaming seasoning or your favorite dry rub
- 2 tablespoons lard or your choice of fat
Instructions
- Brine the cubed pork butt in a 1 gallon of water to 1 cup of kosher salt ratio for 24 hours in the fridge.
- Take the pork out of the bag and place it in a colander. Rinse off the excess brine, dry off the pork, and season it with your dry rub.
- Vacuum seal the seasoned pork in two packets and dunk the packets in the SousVide Supreme set for 165°F for 28 hours.
- Remove the pork and blot the pork cubes dry. Heat the lard in a cast iron skillet and pan-fry the cubes. Drain them on a wire rack.
- Serve the carnitas in lettuce tacos topped with diced white onions, cilantro, Primavera salsa, and homemade guacamole!
Nutrition
| Carbohydrates: 7 g
| Protein: 58 g
| Fat: 23 g
| Fiber: 4 g
| Sugar: 1 g
Nutrition information is automatically calculated, so should only be used as an approximation.
Looking for more recipe ideas? Head on over to my Recipe Index. You’ll also find exclusive recipes on my iPhone and iPad app, and in my cookbooks, Nom Nom Paleo: Food for Humans (Andrews McMeel Publishing 2013), Ready or Not! (Andrews McMeel Publishing 2017), and Nom Nom Paleo: Let’s Go! (Andrews McMeel Publishing 2021).