
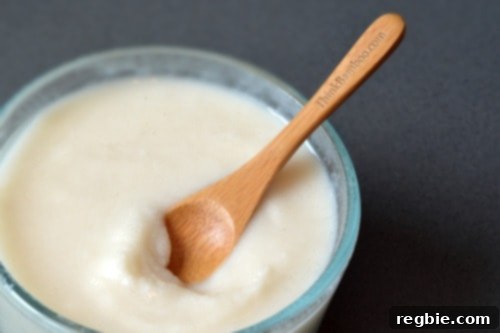
Dive into the delightful world of homemade coconut butter, a luscious and versatile spread that’s surprisingly simple to create right in your own kitchen! This decadent treat isn’t just incredibly delicious; it’s also a fantastic snack that aligns perfectly with various dietary lifestyles, including vegan, paleo, keto, and Whole30. Forget expensive store-bought versions; crafting your own ensures freshness, quality, and complete control over the ingredients.
The inspiration for this easy, irresistible recipe comes from none other than the brilliant paleo food maven, Melissa “Melicious” Joulwan. Her genius contribution to the culinary world, particularly her straightforward method for making homemade coconut butter, has empowered countless home cooks to whip up this creamy delight with minimal effort. This staple in many health-conscious kitchens offers a rich, satisfying experience that can elevate everything from breakfast to dessert. Whether you’re a seasoned chef or a kitchen novice, you’ll be amazed at how quickly you can transform simple shredded coconut into a velvety, nutritious butter.
Unleash Your Inner Chef: Time to Make Homemade Coconut Butter!
Making coconut butter is a truly rewarding experience, transforming basic shredded coconut into a smooth, luxurious spread. With just a few common kitchen tools and a handful of ingredients, you’ll be enjoying your own freshly made coconut butter in no time. This recipe yields approximately 2 cups, perfect for enjoying over several weeks or sharing with friends and family.
Gather Your Ingredients: Simplicity at Its Best
The beauty of homemade coconut butter lies in its minimalist ingredient list. Each component plays a vital role in achieving that perfect creamy consistency and rich flavor. Opting for high-quality ingredients will undoubtedly enhance the final product, but even standard pantry items will deliver fantastic results.
- 8 ounces (about 3 cups) unsweetened shredded coconut: The star of our show! It’s crucial to use unsweetened shredded coconut, as sweetened varieties will result in a cloyingly sweet butter. The natural oils within the coconut meat are what we’re aiming to release during blending. Fine shred or flakes will work, but finer shreds generally process a bit faster.
- 1 tablespoon melted coconut oil: While optional if your blender is exceptionally powerful, a touch of melted coconut oil can significantly aid the blending process. It provides a little extra liquid fat, helping the coconut break down more easily and preventing your blender from working too hard, especially if your shredded coconut is on the drier side.
- 1 teaspoon vanilla extract: This aromatic addition brings a lovely warmth and subtle sweetness to the coconut butter without adding any sugar. A good quality vanilla extract can elevate the flavor profile, making it even more decadent.
- Pinch of Diamond Crystal kosher salt: Don’t underestimate the power of salt! A small pinch of kosher salt (especially Diamond Crystal for its crystal structure and less intense salinity compared to table salt) balances the natural sweetness of the coconut and enhances all the other flavors, giving your coconut butter a gourmet touch.
Essential Equipment for Success
While the ingredient list is short, the right equipment makes all the difference in achieving that silky-smooth consistency. A powerful blender is the most critical item, but a few other tools will ensure precision and ease.
- Kitchen scale or measuring cups: For accurately portioning your shredded coconut. While cups work, a kitchen scale provides the most precise measurement for consistent results.
- Measuring spoons: For the precise amounts of coconut oil, vanilla extract, and salt.
- High-powered blender (a powerful blender is essential!): This is the non-negotiable item. A high-speed blender like a Vitamix or Blendtec is designed to process tough ingredients into smooth textures. Its powerful motor and sharp blades are crucial for breaking down the fibrous coconut meat until it releases its oils and transforms into a creamy butter. A regular food processor can work, but it will take significantly longer (15-30 minutes versus 1-5 minutes) and may require more scraping and resting time.
Simple Steps to Silky Smooth Coconut Butter
The process of making coconut butter is more about patience and proper technique than complex steps. Here’s how to achieve perfection in minutes:
- Begin by adding all your ingredients into the container of your high-speed blender: the unsweetened shredded coconut, melted coconut oil, vanilla extract, and that crucial pinch of kosher salt. Ensure the blender is securely closed.
- Initiate blending on a low speed, gradually increasing to high. Allow the blender to process continuously for about a minute. During this initial phase, the dry shredded coconut will transform from distinct flakes into a fine, flour-like meal. You might notice your blender working hard; this is normal as it starts to break down the fibrous material.
- After approximately one minute of high-speed blending, stop the blender. You’ll observe that the fine coconut meal has started to clump together, forming a thick, somewhat pasty consistency. This is a good sign that the natural oils are beginning to release. If your blender has a tamper, use it to push the mixture down towards the blades. If not, carefully scrape down the sides of the blender jar with a spatula to ensure all the coconut is evenly processed.
- Resume blending on high. This is where the magic truly happens. Continue to process the mixture. Over the next few minutes, the friction from the blades will cause the coconut to heat up, releasing more and more of its natural oils. The paste will gradually become smoother, thinner, and more liquid, eventually reaching a runny, buttery consistency. This transformation typically takes anywhere from 1 to 5 minutes, depending on the power of your blender and the type of shredded coconut used.
- **Important Note on Over-processing:** While you want a smooth, runny butter, be mindful not to over-process. Continuously blending for too long, especially in powerful blenders like a Vitamix, can generate excessive heat. This can not only degrade the quality of your coconut butter but also potentially overheat and damage your blender’s motor. If you notice your blender getting very warm or hear the motor straining, turn it off and let it rest for a few minutes before resuming. A few short bursts of blending are better than one long, strenuous session. Once it reaches a smooth, pourable consistency, you are done!
And just like that, with minimal effort and a powerful blender, you have transformed humble shredded coconut into a magnificent, creamy coconut butter. It’s truly a culinary marvel!
Storage and Rejuvenation Tips
Proper storage ensures your homemade coconut butter remains fresh and delicious for as long as possible. Once prepared, transfer your fresh coconut butter into a clean, airtight container. Store it in a cool, dry place away from direct sunlight. It will maintain its quality for up to a month.
Due to coconut oil’s natural properties, your coconut butter will solidify at cooler room temperatures, especially if stored in the refrigerator. This is completely normal! When you’re ready to use it and prefer a smooth, runny consistency, there are a couple of easy ways to re-liquefy it:
- Hot Water Bath: Place the sealed jar of solidified coconut butter into a pot of warm (not boiling) water. Let it sit for a few minutes, swirling occasionally, until it becomes smooth and runny again.
- Microwave Method: For quick results, spoon out the desired amount of coconut butter into a microwave-safe bowl. Heat it in 15-second increments, stirring well after each interval, until it reaches your desired consistency. Be careful not to overheat it, as this can alter its texture and flavor.
Delicious Ways to Enjoy Your Homemade Coconut Butter
Now that you’ve mastered the art of making homemade coconut butter, the possibilities for enjoying it are endless! This versatile spread can be incorporated into a multitude of dishes, adding a rich, tropical flavor and healthy fats.
- Spread it: A simple yet satisfying way to enjoy it is spread thinly on your favorite toast, rice cakes, apple slices, or even crisp celery sticks. It makes an excellent dairy-free alternative to traditional butter.
- Boost your smoothies: Add a spoonful or two to your morning smoothie for extra creaminess, healthy fats, and a delightful coconut flavor. It helps to keep you feeling full and satisfied.
- Enhance your coffee or tea: Stir a teaspoon into your hot coffee or tea for a creamy, flavorful pick-me-up. It’s a fantastic way to add healthy fats to your morning ritual, especially popular in keto and paleo diets.
- Baking and desserts: Use it as an ingredient in raw dessert recipes, energy balls, homemade granola bars, or even a vegan frosting. Its unique texture and flavor make it a wonderful component in both baked and no-bake treats.
- Drizzle over fruit or yogurt: A warm, runny drizzle of coconut butter over fresh berries, baked apples, or a bowl of dairy-free yogurt adds a luxurious touch and depth of flavor.
- Eat it straight from the jar: Let’s be honest, sometimes the simplest way is the best way! When a craving for something rich and satisfying strikes, a spoonful of coconut butter straight from the jar is a perfectly acceptable (and delicious!) indulgence.
This homemade coconut butter is so simple yet incredibly delicious! A huge thank you to Mel Joulwan for sharing such an accessible and brilliant recipe. It’s a game-changer for anyone looking for wholesome, versatile ingredients to elevate their healthy eating journey.
Craving more culinary inspiration? Explore a treasure trove of delightful recipes by heading over to my Recipe Index. Discover exclusive culinary creations on my iPhone and iPad app, and delve into even more deliciousness within my critically acclaimed cookbooks: Nom Nom Paleo: Food for Humans (Andrews McMeel Publishing 2013), Ready or Not! (Andrews McMeel Publishing 2017), and the latest, Nom Nom Paleo: Let’s Go! (Andrews McMeel Publishing 2021). Each offers a unique collection of recipes designed to nourish and delight.
Printer-Friendly Recipe Card
Coconut Butter
5 mins
5 mins
10 mins
32 servings
Michelle Tam
Print Recipe
Ingredients
- 8 ounces unsweetened shredded coconut (about 3 cups)
- 1 tablespoon melted coconut oil
- 1 teaspoon vanilla extract
- Pinch of Diamond Crystal kosher salt (salt is the key ingredient in my humble opinion)
Instructions
- Dump the coconut, coconut oil, vanilla extract, and kosher salt into a Vitamix or high speed blender and blitz everything on high for a minute.
- After about a minute, a paste forms and you’re done! Don’t over-process the butter because it can overheat the Vitamix and then it’s not good for the machine!
- Store the coconut butter in a sealed container in a cool dry place for up to a month. If it solidifies, you can swirl the jar in a pot of hot water or microwave it in 15 second increments until smooth and runny.
Nutrition
Carbohydrates: 2g |
Protein: 1g |
Fat: 5g |
Saturated Fat: 4g |
Fiber: 1g
Nutrition information is automatically calculated, so should only be used as an approximation.